Gemini

Gemini Amplifier

This program provides remote support for the Gemini HF-1K and DX-1200 amplifiers from Linear Amp UK. This software supports Windows 7 and higher, so Windows XP is not supported. The kit is signed - check for a signing certificate from SDR-Radio.com Ltd.


Download links are at the bottom of this page, including the latest firmware with full installation instructions.


The connection between your computer and the amplifier is Ethernet, the Gemini's IP address is configured from the front panel.


For normal use the software is designed to be intuitive - you will normally only use the Band/Antenna options. Although the band changes by detecting the input frequency from your transmitter, you can also change the band without having to transmit. Similarly select the antenna - A, B or C. The antenna selection is saved for each band.

Quick Start

  • Download and install the latest kit (below).
  • Start the software.
  • In the Home panel of the ribbon bar click Connect:
    • Enter the IP address of the amplifier,
    • Press Connect,
    • Check that the display starts and displays the same values as shown on the Gemini amplifier.

Connecting

You must know the IP address of the Gemini 1K amplifier, this is shown in the front panel's network options window. The default port is 9100. When you know the IP address select Connect from the Home tab in the ribbon bar. Enter the address and press Connect, you should then see a display similar to above in the Introduction.

Settings

Select Settings from the Home tab in the ribbon bar.

Appearance
Select either a preset colour scheme or change the colours as desired.

General
Other options such as brightness, beep settings.

Tracking

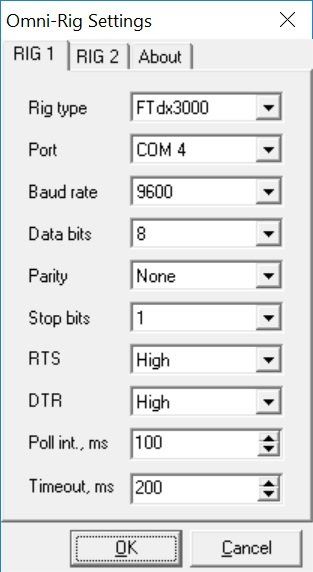
Added August 20th, available in release 1.0.2. The software uses OmniRig from Afreet Software, Inc. to connect this software to your radio via a serial cable or in the case of Flex / ANAN / SDR a virtual serial cable. The radio is regularly polled for changes in frequency, when a different band is selected on the radio the amplifier band is automatically selected without the need to transmit.


Select Tracking from the Options panel in the ribbon bar.


Options

Selecting Tracking options displays the OmniRig configuration window. the important fields are: Rig type (usually written on the front panel of your radio, also found in the handbook), serial port to use and the polling interval.

Speech Support

Speech support is here [Link].

Downloads

There are two files to download:

  1. Remote Software for Windows which is used to monitor and control the amplifier.
  2. Amplifier firmware.

Remote Software

This is the software which runs on your Windows computer.

Current

The current kit is version 1.2.0, February 22nd 2022 [Link].

Previous

Version 1.0.16, August 22nd 2021 [Link].

Version 1.0.14, August 16th 2021 [Link].

Version 1.0.11, June 12th 2021 [Link].

Version 1.0.9, February 20th 2020 [Link]
Version 1.0.8, January 9th 2020 [
Link ]
Version 1.0.7, January 7th 2019 [
Link ]

Version 1.0.6, November 26th 2019 [ Link ]

Version 1.0.5, August 9th 2019 [ Link ]
Version 1.0.3, September 7th 2018 [ Link ]
Version 1.0.2, September 4th 2018 [ Link ]
Version 1.0.1, August 10th 2018 [ Link ]

Amplifier Firmware

This is the software which runs inside your amplifier.

Note: firmware releases are cumulative, the most recent download contains all fixes and enhancements.

Current

Version 2.5Ee, May 16th 2022 [Link]. Note: You must upgrade to 2.5A before installing 2.5Ee.

Previous

Version 2.5A, February 21st 2022 [Link]


Change Log


Firmware release 2.5 for Gemini HF-1K and DX1200

Adds background datalogging of amplifier internal parameters. The data can be offloaded using the version 1.2.0 Remote Software and saved to a file. This file can then be forwarded to support if needed. 2.5A also includes some other minor bug fixes. We encourage all users of HF-1K and DX1200 amplifiers to upgrade to this version as this enables better remote diagnostic support if needed.


Firmware release 2.3 for Gemini HF-1K and DX1200


  • Adds white on black screen option, better standby screen and background updates..


Firmware release 2.2C for Gemini HF-1K and DX1200


  • When the power setting (LP/MP/HP) is changed the new value is highlighted for a couple of seconds (the value blinks several times). 
  • Catches rare occasions when internal PSU fails to start properly.


Firmware release 2.1l for Gemini HF-1K and DX1200


This is an important release as it adds Power Output control functionality to the amplifier. When operating at less then full power the efficiency of any LDMOS device starts to degrade for a given VDD value. Lower efficiency means more heat generation for a given power output. At its extreme the amplifier can generate twice as much heat as it does RF.


The solution for lower RF outputs is to reduce the VDD voltage thus pushing the devices back up the efficiency curve.


Firmware 1.2l introduces selectable Power control.


On the amplifier display next to RFout you will now see (HP), (MP) or (LP).


HP – High Power (100% output)

MP – Medium Power (about 75% of maximum)

LP – Low Power (about 50% of maximum


Touching the bargraph area for Rfout toggles the amplifier through LP,MP,HP modes.


If you are operating at lower powers then toggle the Power output mode accordingly and keep your drive power the same. 


Older

1.20f corrects band switching for the DX-1200.


1.20b Corrects for vswr display errors in some hardware versions of the amplifiers.


1.06 resolves issue of band re-selection error sometimes occurring on SSB on 24/28MHz.


1.05 minor changes to internal timings when changing bands and antennas to correct occasional false trip errors.


1.03 fixes issue where changing from some bands which involved an antenna change at the same time sometimes caused a high VSWR Trip. Adds amplifier name to DHCP record. Fix for out of band errors when doing two tone tests on some bands.

Firmware Upload

Firmware is loaded into the amplifier using FTP. The FTP code is a slightly modified version of FTP Client Class from Codeproject.com.


  1. Power the amplifier on while pressing the small PROG button on the rear of the amplifier.
  2. Note: Do not connect to the amplifer.
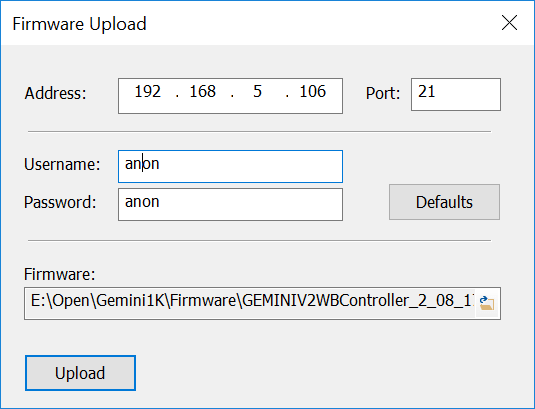
  3. Select Firmware Upload from the Options tab in the ribbon bar.


In the Firmware Upload window click Upload and enter:

  • Amplifier IP address, port 21. (To see the address assigned to the amplifier's FTP server click Set Network on the front panel.)
  • Username=none, Password=none (currently the username and password are not used)
  • Select the firmware to be loaded (a .HEX file)
  • Press Upload to start the Upload.
A full upload takes typically 90 seconds, the progress is shown in the main window.

Connecting to 192.168.5.106::21
220 Service ready for new user.
331 User name okay, need password.
230 User logged in, proceed.
200 Command okay.
215 Chrysalis Embedded FTP
.
Uploading E:\Open\Gemini1K\Firmware\GEMINIV2WBController_2_08_17_04_22.hex
Sending 481 KB
200 Command okay.
200 Command okay.
150 File status okay; about to open data connection.
100 KB, 200 KB, 300 KB, 400 KB, 481 KB
.
Closing

When the transfer finishes the amplifier will automatically restart.

Errors
Do not change the FTP server address and/or port, these must be left exactly as shown below.
Share by: